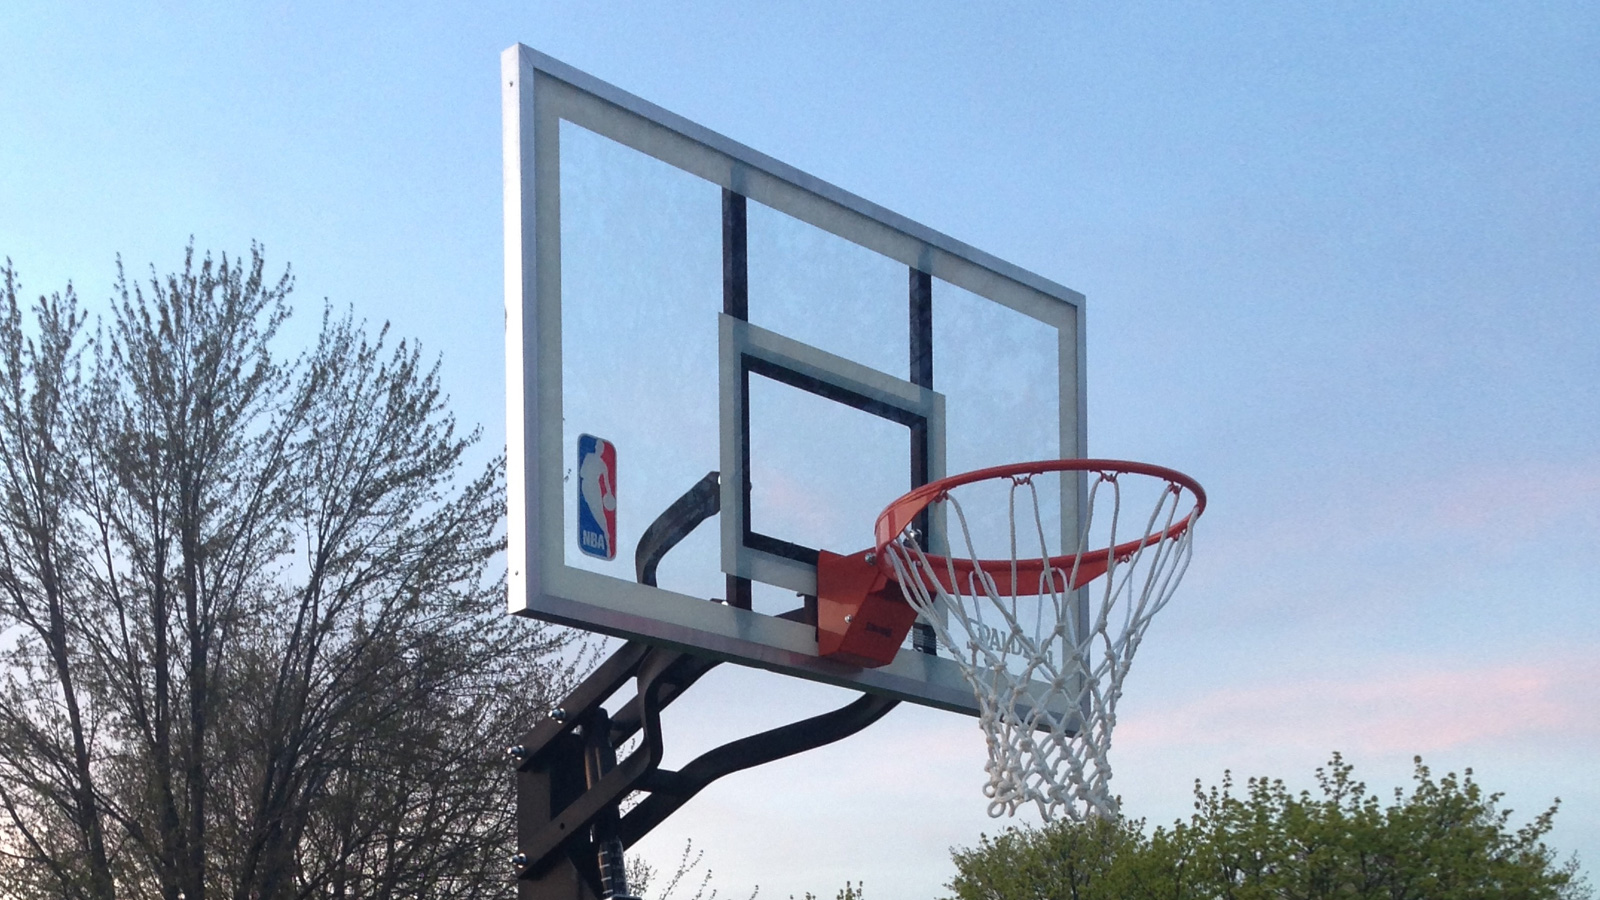
Another weekend project was installing a basketball hoop for the kids. I’ve never been fond of the portable hoops with the plastic, water-filled base. They are always crooked and wobbly. I wanted an in-ground hoop. While surfing the web one day in March I found a great deal on the Spalding 88454G NBA 54″ Glass Backboard In-Ground Basketball System on Woot.com. Selling for around $500 on Amazon, they had it for $299 with $5 shipping. I ordered it on a Friday, it shipped the following Monday, and a big, huge, heavy box was sitting on my porch on Tuesday. Great service.
It was early April and Spring was here. Before I got started, I read some of the reviews on Amazon and searched the web. There were some horror stories about the assembly. It seems that instructions don’t match the parts that are actually included, so you have to make a lot of assumptions. The system has a two piece pole, and there were also many stories about trouble folks had getting the poles together, often times bending them or settling for a less-than-recommended overlap. I also realized from reading the instructions that I needed a 2-foot wide by 2-foot deep hole for the base. I remember from digging holes for bushes that deep holes are no joke. Dirt is heavy, and the clay further down is even worse.
So, the weekend after the hoop arrived I started digging the hole. I started with a spade and flat shovel, and did well for a while. I got about a foot and a half deep and thought that I was doing alright. I read more stories about post digging and found an interesting fact… while two feet is the recommended minimum depth, the instructions advised checking for the proper depth based on location. It is recommended that the footing for the post be set below the frost line to prevent frost heaving. In Michigan, I discovered that the frost line is actually around 48 inches 🙁 Only two and a half feet to go…
By that point, I was starting to hit clay. I considered getting an auger, but the ones at Home Depot stated that they aren’t for clay. I did more research to find the right tools, and read about a Post Hole Digger and a Tamper Head Digging Bar. The digging bar is essentially a 6-foot, 17 pound crow bar with a flat, sharp edge on one end and a flat round circle on the other end. These worked great to help me finish off the hole. I got it down to four feet by the end of the weekend. Then the Michigan weather kicked in.

It was cold and rainy for the next three weekends. I tried to cover the hole with a tarp, an old window screen, and bags of mulch, but the hole filled up with water three times. I pumped it out with the wet/dry vac – well over a hundred gallons of water each time. We finally started getting some sun near the end of April, but it was still cold, with lows in the 30s and highs in the 40s. As I read up about concrete, it was recommended to only set concrete when the weather doesn’t get below freezing and gets above 60.
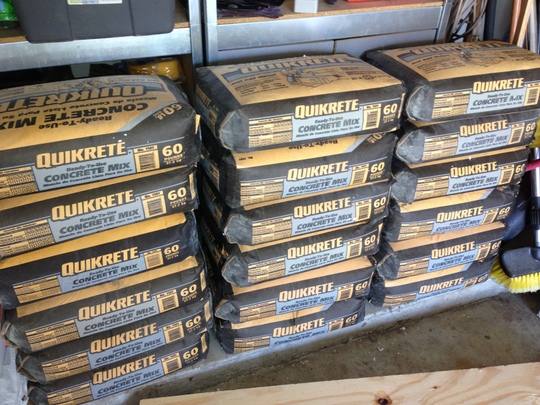
During this time I was stock-piling concrete. Home Depot had 60-pound bags for $2.00. Based on the instructions, I needed 900 pounds of concrete. When the hole depth doubled, I realized I needed about 26 bags of the 60# concrete. Realizing that this was too much to mix by hand, I looked into renting a cement mixer or having concrete delivered. I needed a half yard of concrete, and most concrete places won’t deliver that small a load. A colleague of mine told me about a place called Angelo’s that sells U-Cart Concrete. You bring a truck with a trailer hitch, they hook up a trailer filled with mixed concrete, you take it home, dump it for your project, wash it out, and bring it back. The cost for a half yard is $70. I considered whether I would spend $60 on bags of concrete mix, plus $80 for the mixer rental, plus $40 to rent a truck to get it home, or I spend 5 hours mixing concrete by hand in a wheel barrel, or I could spend $70 for the U-Cart concrete and $40 to rental a U-haul truck to get it home. Easy call.
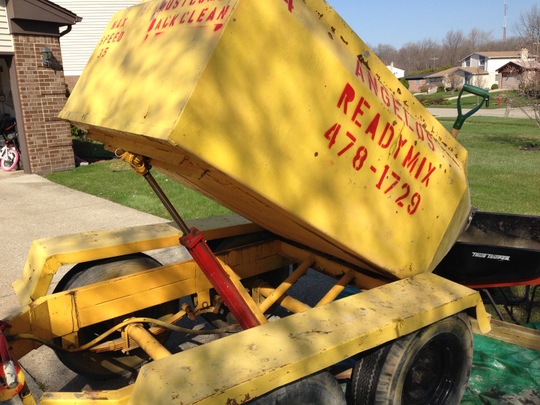
By the end of April, we finally had a dry, warm Saturday with warm weather expected all weekend. I got up early, rented the U-haul pick-up, drove to Angelo’s in Farmington Hills, got the concrete, filled the hole and set the post. I rinsed out and scrubbed down the closed trailer in my driveway and drove the murky water to a coin-operated car wash to finish the cleaning. I had the cart back by noon and my back felt great. I was able to handle this all by myself. I took all the bags of concrete back to Home Depot, and waited for the concrete to set. I tried to brace the pole, but could never get it quite straight. The only mistake that I made was trying to shift the post after it had set. I move it just a bit, but all that did was loosen up the concrete and made the pole a little wobbly. Next time I’ll know to just leave it alone.
Here is some more advice about installing this system:
- Get pre-mixed concrete if you can.
- The instructions call for setting the bottom half of the pole in the sleeve, then removing and assembling the pole after the concrete sets. They also recommend filling the pole with concrete, then putting the filled pole back in the sleeve. I removed and assembled the pole a couple of days after setting the concrete, then put the pole back in the sleeve and filled it from the top with an apple juice jug. Trying to fit the pole back in the sleeve was difficult when it was empty, and I can’t imagine how hard it would be if the pole were filled with 120 pounds of concrete.
- I marked and sanded down the paint on the bottom pole before putting it together. I also sprayed down the top of the bottom pole and the inside of the top pole heavily with WD-40. I bounced the poles on a piece of plywood on the driveway and they actually slide past the mark. I ended up having to drill holes for the bolt because I slide past the holes. Better than the horror stories.
- I still had some pole shake from my shift while the concrete was setting. I fixed this by filling the cover over sleeve bolts with concrete and pressing it down. When that concrete set, along with the concrete in the pole, the pole was sturdy.
- There are small holes in the pole in the front and the back. I’m not sure whythey are there. Be sure to cover then up before filling the concrete to prevent water from running down the pole.
- The instructions also recommended covering the pole seam before filling the concrete. I never quite found the right tape to use. I tried painters’ tape and masking tape, but they didn’t stick to the pole. I was scared to use duct tape; I figured it would leave residue on the pole. I just ended up rubbing off the water marks.
- I was able to mount the backboard with the assistance of my wife. I stood on a table and lifted the backboard while she fed through the bolts from a ladder behind the backboard. We had the backboard up in about 15 minutes.
Hopefully I mounted the rim correctly. This system had some really bad instructions. For the rim, it said to refer the instructions included with the rim, but the rim didn’t include any instructions. I left the pad and the metal washers in place in the backboard, and fed through the bolts from inside the rim. I think I got.
With that, I was finished. Brandon was able to shoot around for a few minutes before bedtime. We are able to easily raise and lower the rim, and it looks great. So far so good.
There are no comments